

This cake is very popular amongst Chinese bloggers. I am not 1st time did this cake, actually i have did it for 5 times ( 3 failures and 2 success attempts). You can check in Mikiko's post and this post about the real Xiang Si cake which is famous in Batu Pahat.


See my 1st attempted..cake rose too high and collapsed like nobody business. I tried with Yuzu powder and orange juices..

The 2nd attempted has better result, but the bottom of the cake shrunk a lot. After consulted to the owner cum chef of the bakery shop, she told me if line bottom with paper, can not invert for too long. And she also told me if using cake pan without tube or insert at the middle, have to beat egg white till stiff peak or close to stiff peak..Learnt two tips from her.
I did with chocolate flavour this time.

3rd attempted -Finally i got a success and perfect cake after i adjusted my oven temperature, every oven is difference, so you have to understand your oven..I did not line paper at all this time.

I placed 5 bowls of hot water underneath..


No majar collaped..

This time i share with you the detail steps of how to beat egg white till close to stiff peak 九分发. I found the important point to making a success Xiang Si Chiffon Cake is beat the right meringue and know your oven temperature..This recipe i measured the egg yolk and egg white accordingly to recipe, but the following recipes i just don't bother to measure anymore, all using 5 large eggs..
巧克力相思蛋糕 Chocolate Xiang Si Chiffon Cake
(recipe source; adapted from Siew Hwei who adapted from Baking Wonderland 的 Jasmine Ang, with my own method and little changes)
*for 8 “ square pan
A)
15g cocoa powder
25g hot water
1/4tsp chocolate emulco (optional)
B)
45g corn oil
55g milk
A pinch of salt
100g egg yolk (5 large eggs + 1 medium egg)
1 whole egg (medium)
65g super fine flour
C)
200g egg white (5 large eggs + 1 medium egg)
65g castor sugar
1/2tsp cream of tartar or 1/2tsp lemon juices
Method:
1. Pre-heat oven to 150C and place racking at the 2nd from lowest.
2. Mix ingredients (A) in a small bowl, stir well and set aside.
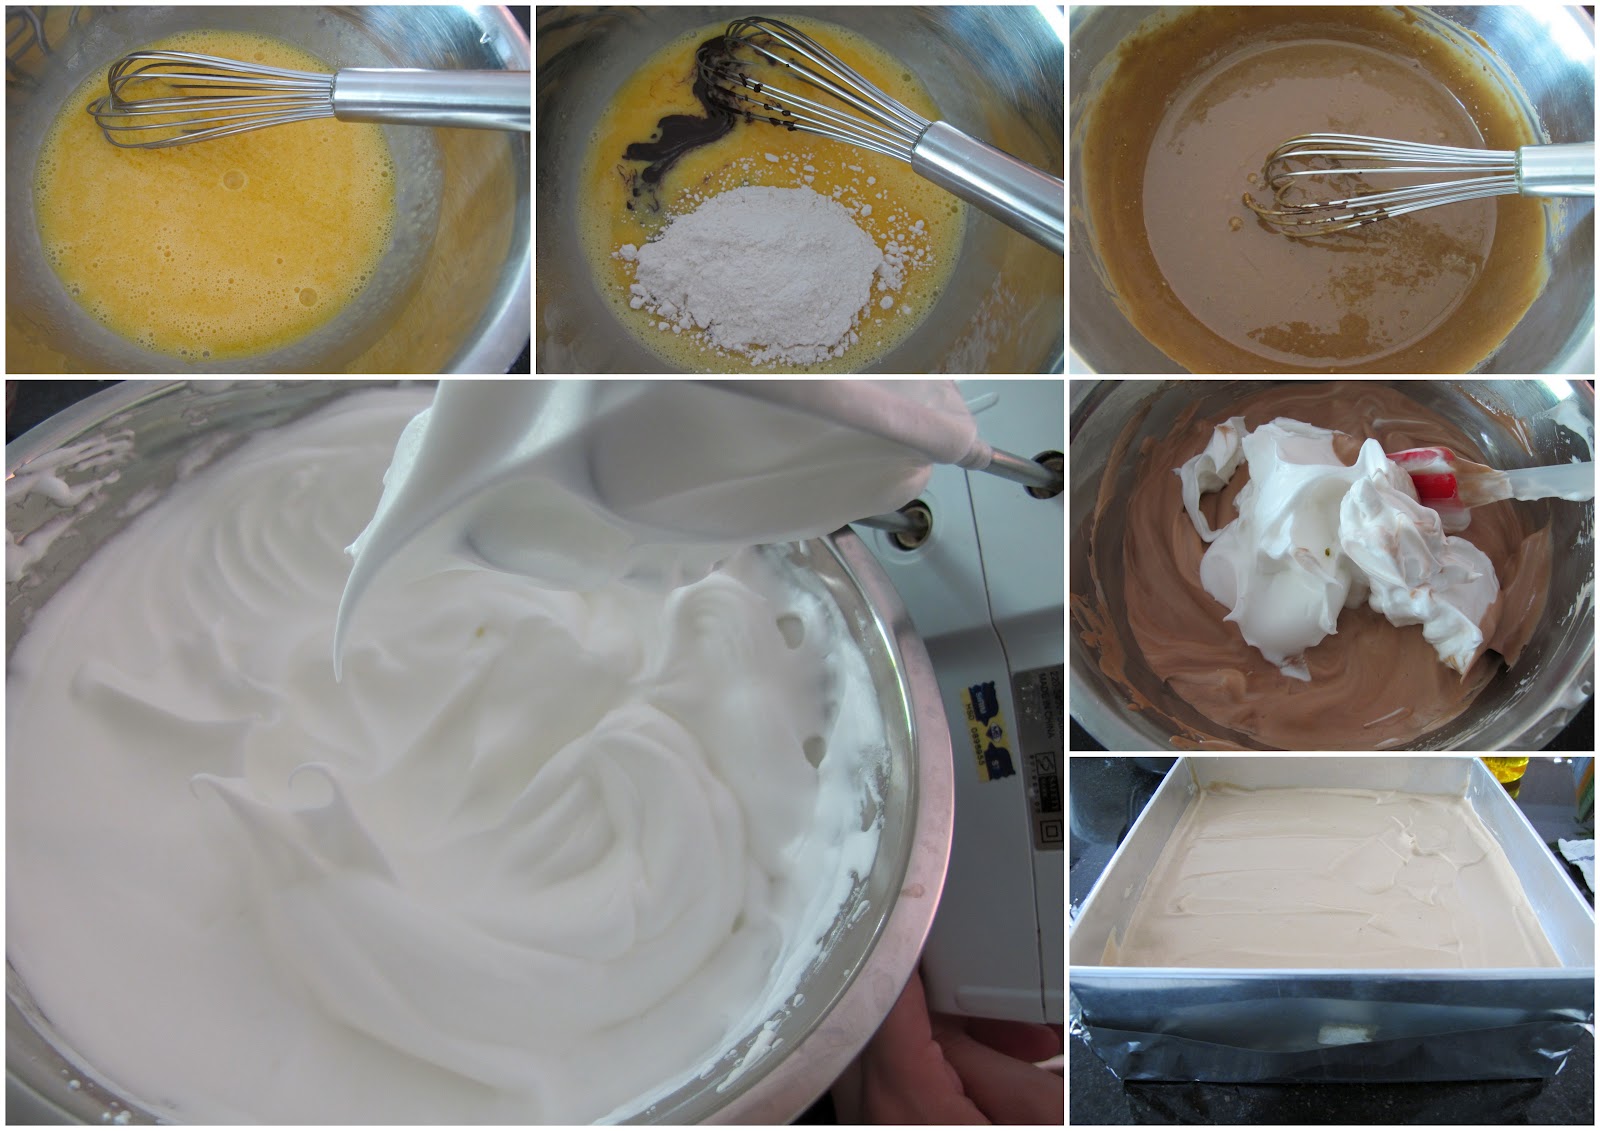
3. Add whole egg with egg yolks, lightly stir well with hand whisk.
4. Add in corn oil, milk and cocoa mixture (No1), mix well.
5. Add in cocoa mixture (No1), combine well.
6. Sift in flour and combine well.
7. To beat egg white till 九分发 (close to stiff peaks) ~timing stated below just for your reference, every hand mixer works differently.
a. Separate the eggs while they are cold fridge. Cold eggs are easier to separate because the white is thicker. Let the egg whites stand at room temperature while you are preparing the egg yolk batter.
b. Add cream of tartar or lemon juices into egg white, beat till foamy 鱼眼泡 (30 sec over speed 3)
c. Add in 1/3 sugar, beat till smooth (30 sec over speed 3)
d. Add in 1/3 sugar, beat till double in volume (30 sec over speed 3)
e. Add in the balance 1/3 sugar, beat till smooth meringue (60 sec over speed 3) 八分发
f. Continue to beat ( speed 3 ) till九分发 that meringue is smooth and glossy and close to stiff peaks (十分发 / 硬性发泡). The tip is stand straight but with little crook at the end of tip.
8. Pour hot water into 5 small metal bowls, place under the lower rack.
9. Take 1/3 meringue and mix with egg yolk batter using a hand whisk. Change to spatula, fold in 1/3 of meringue till combine, then fold in balance 1/3 meringue and lightly mix well. Pour batter into a removable bottom square pan (don’t need to line with paper but wrap foil at the bottom ), lightly tap on countertop to remove air bubbles.
10. Bake at 150C for 30mins, increase to 160C and bake for another 30mins.
11. Invert the cake after baking, remove the cake after 15mins (Do not wait for too long, otherwise the heat will evaporate and turn to water and the cake bottom will became wet). Let it continue to cool completely on a wire rack before cutting the cake.
4th attempted- i bought another 7" square pan as I noticed the 8" cake don't have clear and nice wire rack pattern after inverted. I still followed the 8" cake recipe but the 7" cake was cracked like nobody business. I suspected i have to adjust the oven temperature for smaller cake. Sorry, i was too upset and did not take photo this time. Actuall now i understand why my cake don't have very nice and deep wire rack pattern, because i have taller cake pans.
5th attempted -Today i tried again with this dual colours of Xiang Si Chiffon cake, and this time I tried with the method from plain sponge cake recipe which is without steam bake. And i am glad with the result is equal to steam bake . So i dont need to place water underneath anymore..


My daughter like this dual flavours..Even without waterbath or steambath method, this cake still very moist, soft and light.
双色抹茶可可相思蛋糕 Matcha and Chocolate Xiang Si Chiffon Cake
(recipe source: adapted from Chrystal 厨房找快乐, with my own method )
*for a 7 “ square pan
50g corn oil
60g milk
A pinch of salt
5 large eggs
1 whole egg (medium)
70g super fine flour
1tbsp green tea powder + 10g water, mix and set asde
1tbsp cocoa powder + 10g water, mix and set aside
5 large egg white
80g castor sugar
1/2tsp cream of tartar or 1/2tsp lemon juices
Method:
1. Pre-heat oven to 140C and place racking at the 2nd from lowest.
2. Add whole egg with egg yolks, lightly stir well with hand whisk.
3. Add in corn oil, then followed by milk, mix well.
4. Add in salt and flour, combine well. Equal divide into two portions.
5. To beat egg white till 九分发 (close to stiff peaks) ~timing stated below just for your reference, every hand mixer works differently. Total time spent about 5-6mins
a. Separate the eggs while they are cold fridge. Cold eggs are easier to separate because the white is thicker. Let the egg whites stand at room temperature while you are preparing the egg yolk batter.
b. Add cream of tartar or lemon juices into egg white, beat till foamy 鱼眼泡 (30 sec over speed 3)
c. Add in 1/3 sugar, beat till smooth (30 sec over speed 3)
d. Add in 1/3 sugar, beat till double in volume (30 sec over speed 3)
e. Add in the balance 1/3 sugar, beat till smooth meringue (60 sec over speed 3) 八分发
f. Continue to beat ( speed 3 ) till九分发 that meringue is smooth and glossy and close to stiff peaks (十分发 / 硬性发泡). The tip is stand straight but with little crook at the end of tip.
6. Equally divide meringue into two equal portions. Add one portion of meringue with cocoa batter and fold well using spatula. Add another portion of meringue into green tea batter and fold well using spatula.
7. Pour batter into a removable bottom square pan (don’t need to line with paper), lightly tap on countertop to remove air bubbles.
8. Bake at 140C for 25mins, increase to 160C and bake for another 35mins.
9. Invert the cake after baking, remove the cake after 15mins (Do not wait for too long, otherwise the heat will evaporate and turn to water and the cake bottom will became wet). Let it continue to cool completely on a wire rack before cutting the cake.
0 comments:
Post a Comment