Showing posts with label cookie. Show all posts

Monday, December 9, 2013

Florentine Cookies 佛罗伦萨饼干

The other day my friend mentioned to me that she is going to make Florentine cookies for the coming CNY. I have never heard of this cookie before, after googled then I only know Florentine biscuit is an Italian pastry made from setting nuts and candied cherries into a caramel disc, which is then often coated on the bottom with chocolate. Other types of candied fruit are used as well.
Since I still have some leftover nuts and dried cranberries, so I quickly use it to make this cookie.


fc9 copy


fc12.jpg
 
 
This cookie is chewy and sweet..

fc10 copy


Florentines Cookies 佛罗伦萨饼干

100g whole hazelnuts
50g dried cranberries, chopped
fc copy30g desiccated coconuts
20g flaked almonds
2tbsp cake flour

50g sugar
50g honey
40g salted butter

100g dark chocolate

Method

  1. Place the hazelnuts on a baking sheet and bake for 10 minutes (180C) or until fragrant and the skins begin to flake. Remove from oven and place the hot nuts in a dish towel. Roll up the towel and let the nuts sit (steam) for 10 minutes then briskly rub the nuts in the towel to remove the skins. Let cool and then coarsely chop. Set aside.
  2. Place almond flakes on a baking sheet and bake for 4mins at 170C or until lightly browned and fragrant. Remove from oven and let cool. Set aside.
  3. Add hazelnuts, almond, desiccated coconuts, cranberries and flour, stir until all the fruit and nuts are coated with the flour.
  4. Put the sugar, honey and butter in a small saucepan and gently melt together.
  5. Add the honey mixture to the fruit and nut mixture and stir to combine.
  6. Line a large baking tray with greaseproof paper, and spread the Florentine mixture out to a thin layer – don’t worry if you have small gaps, it should melt together in the oven. Bake for 10-12 mins (oven at 180C) until a rich golden colour, then set aside to cool and firm up.
  7. Melt the chocolate all in separate heatproof bowls over gently simmering water. Line a second large tray or board with greaseproof paper and carefully flip the cooled Florentine bake onto it. Peel off the greaseproof paper. Spread the melted chocolate over and let set before cutting into small shapes as per your desire.
  8. Keep Florentines in the refrigerator. Bring to room temperature before serving. 

Recipe reference: here and here, by Sonia aka Nasi Lemak Lover


fc8 copy

 
My neighbour given me some dark chocolate,  in return I packed some cookies for them.

fc11 copy

I am submitting this post to "Baby Sumo's Christmas Recipes Collection 2013" event which is hosted by Baby Sumo of Eat Your Heart Out.


Wednesday, February 27, 2013

Dahlia cookies (Old fashioned custard butter cookies) 卡士达牛油饼干


Finally i managed to make this custard butter cookie that suit to my sister's demand. What was her demand?  less buttery, less sweet, not strong custard taste, still taste light and almost melt-in-mouth, hahaha, very demanding !!
Once i done with this cookies, my husband just came back for lunch, and he could not stop eating this cookie after the first bite..I was wondering got so good mer, or he just wanted to please me and make me happy, hahaha..


This was the first batch of dahlia cookies that sent to my sister to taste out. She said the taste is almost there, but still need some modification to suite her taste!! Then i have to make 2nd batch..

IMG_6651 copy

I use this piping tool to pipe the dough that look like dahlia flowers.

IMG_6746 copy

I want the 2nd batch of Dahlia cookies look like this real Dahlia, so i started to play with colours..

IMG_7230


IMG_7233
IMG_7235
IMG_7236

Before baking look nicer than after baked!
IMG_7240 copy

After baked
IMG_7254 copy

At last, my sister is satisfied with the 2nd batch of Dahlia cookies..But she still have last comment, why the red spot look like blood spread on cookies, hahahaha..

IMG_7285 copy


Dahlia cookies (Old fashioned custard butter cookies) 卡士达牛油饼干
(recipe source: modified from Dapur Tanpa Sempadan )


150g butter, at room temperature
IMG_7254 copy
70g icing sugar
1 egg yolk
140g cake flour
60g corn flour
40g custard powder

Few drop of red food colouring (optional)
Pickled red cherries, chopped, for decoration

Method
1. Sift cake flour, corn flour and custard powder together.
2. Beat butter, icing sugar until light and creamy.
3. Add in egg yolk, beat till combine.
4. Add in sifted flour and mix until mixture well combined and smooth. If you want to have two tone colours, add few drop of red colour on a small portion of dough.
5. Pipe dough on a pan lined with paper.
6. Place a small piece of red cherry on top of each dough.
7. Bake at pre-heated oven at 150C (fan forced) at lower rack for 23mins.


IMG_7298 copy


Oh ya, this CNY i also made my son Desmond's favourite Kuih Bangkit (tapioca cookies). But this year I changed a bit of the recipe, half portion of Sago flour and half portion of Tapioca flour. According to the owner of the bakery ingredients shop, more sago flour added, resulted more crispy cookies, she said some peoples even use 100% sago flour..But i don't want to follow her suggestion, if use all sago flour, then i can not call this as tapioca cookies anymore, hehehe..
We love this cookie which is cripsy, delicate, melt-in-mouth feel, and full of coconut aroma!!
(try to use very fresh and thick coconut milk )


See Desmond helping me frying the flour, but after few minutes, he already run away, complaining his hand is pain, hahaha..


This is the last post related to this year CNY..
Now i am starting to prepera final round up of CNY Delights 2013 event and draw the lucky winners..And i have decided to increase the number of lucky winners from Two to Five , in view of your strong support !! Check it out later tongiht !!


I am submitting this post to Chinese New Year Delights 2013 hosted by Sonia aka Nasi Lemak Lover


Monday, February 18, 2013

Old Fashioned Chinese Peanut Cookies 花生饼

After Pai Tin Kong (CNY day 9) , as a Hokkien I considered i have almost done with CNY celebration. Anyway i still have few plans till CNY day 15 on this coming Sunday..To my Chinese bloggers and readers, how was your CNY celebration? I guess everyone must be very busy visiting friends and relatives, attending lunch or dinner and etc..me too either.. In fact, i have no time to on my PC to update my blog, visit other blogs and reply reader's questions, even my kedai runcit (shop) have to temporary tutup kedai (close shop), ^_^..
Ok, come back to this peanut cookies, it was requested by my hubby on the last minutes before re-union dinner. I remembered my mom did this cookies when we were young, so I called to my mom to check with her the recipe, as usual, i got a agak-agak (estimation) recipe..what i remembered she told me to use equal bowl of peanuts and flour (it doesn't meant it is equal in weight) and one important ingredient is pork lard oil..this is the key ingredient to make it tasty!!
I again almost want to cry after tasted my first peanut cookies, it was so so good, very nice peanut aroma and simply melt-in-mouth, recall my childhood memory, so nostalgia !!


IMG_7509 copy

First, wash it clean and dry under hot sun..(I think it is ok not to sun dry but straight roast it)

IMG_7437


make sure to roast it completely cooked and golden brown otherwise the cookies will taste raw ..

IMG_7456

Soft and smooth dough ready for shaping..

IMG_7484

I also asked my mom how to make the round pattern on the cookies? she said last time she use those sewing thread cone..She is true, use this cone made  nice and round pattern , hehehe..

IMG_7492

ready to go into oven..
IMG_7503 copy


IMG_7505

This cookies only last till CNY day 2...My husband even warned Lucas not to finish this cookie when CNY day 1 as he was practising full vegetarian meal on day 1 so he could not take this cookie, LOL !!
I also like the sexy crack looking of this peanut cookies ^_^

IMG_7545 copy

Old Fashioned Chinese Peanut Cookies 花生饼
(recipe source: Sonia aka Nasi Lemak Lover’s mom recipe)

3 cups roasted and skinned peanuts or ground nuts
IMG_7516 copy 3 cups plain flour
1 cup icing sugar
1/4tsp salt
1/3 cup pork lard oil (fry small cubes of pork fat in a clean wok, till lard oil come out)
3/4 cup cooking oil (with peanut flavours)

1 egg yolk, for glaze

Method

To prepare roasted peanuts
1. Wash and clean the peanuts.
2. Sun dry peanuts or straight put into a clean wok without oil
3. Roast peanuts over low heat till cooked and golden brown, stir from time to time.
4. Set aside to cool, then remove the skin.

To make peanut cookies
1. In a food processor, finely chopped peanuts. Set aside.
2. In a large mixing bowl, combine sugar, flour, salt and chopped peanuts.
3. Add in lard oil and slowly add in cooking oil to form a soft and smooth dough.
4. Pinch dough and weight 10g each, roll to ball size and place on a lined baking tray.
5. Use a sewing thread cone to press on the center of each cookie to create a round pattern. Brush top of the cookies with egg glaze.
6. Bake at a pre-heated oven at 170C (no fan forced at middle rack) for 20mins.

IMG_7533 copy


I am submitting this post to Chinese New Year Delights 2013 hosted by Sonia aka Nasi Lemak Lover


Tuesday, February 5, 2013

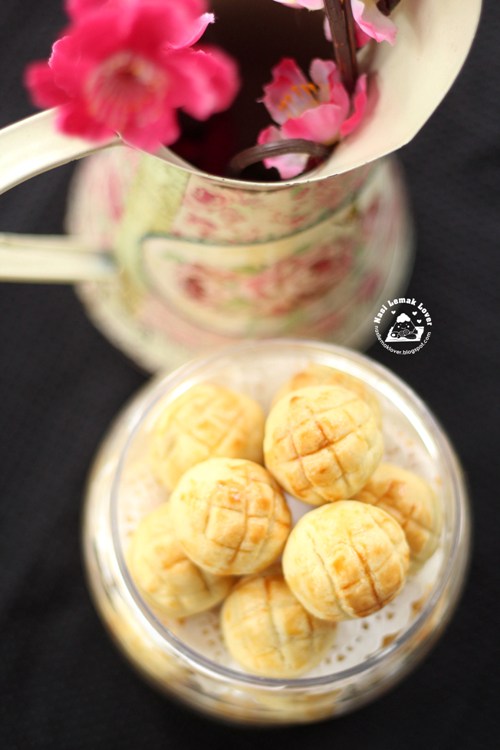
My best melt-in-mouth Pineapple tarts (enclosed version) 最酥的凤梨酥

I would said pineapple tarts rank number 1 among all CNY cookies, do you agree?
As a Hokkien, we called pineapple as "Ong Lai", means bring good luck. So every CNY, i must bake some pineapple tarts, if not bake some, i afraid our "Ong" will not come, hehehe..

IMG_7190 copy

Thanks to my Malay friend who shared this super easy pineapple tart pastry with me, which only requires four ingredients, butter, condensed milk, flour and egg yolks..
And I love this pastry very much, it is simply melt-in-mouth !! Maybe you have your own melt-in-mouth recipe, but this is the best melt-in-mouth pineapple tarts version that I have tried so far..
The highlight of this pastry recipe is using very ordinary condensed milk or sweetened creamer  which everyone should have some at home especially prepare Milo drink..

IMG_7113 copy

This year, i also started to make my own pineapple filling..and i prefer only use two ingredients i.e pienapple and sugar, not adding other spices like cloves or cinnamon..I just want pure pineapple fragrance..

IMG_7098 copy

At first i bought the ordinary pineapple (i think it is Morris pineapple) from market , only cost me RM 1 for each (like shown in the below picture, without the outer skin)..Last two days, Giant supermarket had the promotion of Josephine pineapple which only cost RM 0.78 for each, i quickly bought few..After tasted pineapple filling from two difference types, i feel Josephine pineapple tasted nicer than the ordinary one..more pineapple aroma..

pineapple filling

Since my family prefer less sweet pineapple filling, usually i will bake pineapple tarts before last few days to CNY, since less sugar it will not last too long..

IMG_7104 copy

And this pastry is not sticky at all, easy to be handled..Also i prefer to use those ordinary butter (like Bxxx brand) , so no strong buttery taste over take the pineapple aroma..

IMG_7118


This time, i did not make the usual Nastar shape, i made into ball and enclosed version.

making pineapple tarts

This beautiful vase given by Jessie just came in the right time, perfect to decorate with some flowers..

IMG_7166 copy

no one can resist this melt-in-mouth pineapple tarts !!

IMG_7192 copy


My best melt-in-mouth Pineapple tarts (enclosed version) 凤梨酥
(recipe source: by Sonia a.k.a Nasi Lemak Lover)
*makes 100pcs

350g butter

IMG_7158 copy 100g condensed milk or sweetened creamer
510g plain flour / all purpose flour
2 egg yolks

1 egg yolk +1tsp milk, for egg wash


700g Pineapple filling (homemade or store-bought)


Method

1. Cream butter and condensed milk till light.
2. Add in egg yolk one at a time, and beat until combine.
3. Mix in flour, mix till become a soft and not sticky dough.
4. Roll pineapple filling into ball (8g each) and roll dough into ball (10g each).
5. Flatten a piece of dough and place a piece of the roll pineapple filling in the middle. Bring the edges of the dough together and press lightly to seal. Roll it in between your palms to shape it into a roll.
6. Cut few lines on the pineapple balls to create pineapple pattern, apply egg wash with a brush.
7. Bake in preheated oven at 165C (fan forced) for 23mins or till golden brown.
8. Cool completely before storing.

Homemade pineapple filling


1.5kg pineapple flesh (from ripe pineapple but not over ripe) , process finely in a food processor (do not add water)


250g coarse sugar (adjust accordingly)


Method

1. Cook pineapple flesh together with the juices in a wok over medium low heat until water reduced, stir from time to time.
2. Add in sugar and cook over low heat till thick, stir from time to time, takes about 1 hour.


My husband like to decorate house with pineapple lanterns than the ordinary lantern..But this year, he got two huge pineapple lanterns, about 4 feet long, because the sales girl wrongly gave him this size, hahaha.. 

IMG_7212


I am submitting this post to Chinese New Year Delights 2013 hosted by Sonia aka Nasi Lemak Lover


This post is also linked to the event, Little Thumbs up organised by Doreen from my little favourite DIY and Bake for Happy Kids, the theme of this month is Pineapple! Please join the fun if you bake or cook anything with pineapple this month.


Monday, February 4, 2013

Flower Ghee Almond Cookies 花花酥油杏仁饼乾

I supposed a lot of Chinese bloggers are busy baking with cookies now for CNY which another few days to go. I also baking my last few batches of cookies now. I bake these cookies for my friend to bring back home to Kuching. My friend like this cookie a lot, i noticed he ate a lot of this cookie when he came to my house last time..


IMG_6464 copy


This is an ordinary ghee ball recipe which is simply melt-in-mouth. This time i just want it to look more nicer than ordinary ball shape, so i just cut it into flower shape..

IMG_6475 copy


Flower Ghee Almond Cookies
(recipe source: made slight changes to old recipe here)

135g Ghee
IMG_6501 copy 60g icing sugar
1/4tsp salt
1 egg yolk
150g cake flour
1/2tsp baking powder
50g almond flour or ground almond

Extra egg yolk for decoration

Method
1. Cream Ghee and icing sugar till light.
2. Add in egg yolk and mix well.
3. Sift in cake flour and baking powder, add in almond flour, combine well till soft dough.
4. Flatten the dough on two sheet of plastic sheets, use a flower cutter and cut out the shape
5. Take a chopstick, dip in egg yolk and lightly press on the cookie.
6. Bake at pre-heated oven at 170c (at lower rack) for 10-15mins or till golden brown
7. Remove the cookies from the oven, and transfer them to cooling rack to let cool completely before storing in airtight container


I am submitting this post to Chinese New Year Delights 2013 hosted by Sonia aka Nasi Lemak Lover


Friday, February 1, 2013

Honeycomb Cookies (Kuih Rose/Loyang) 蜂窝饼

Phew! i spent the whole afternoon to use these three kuih loyang moulds to make my 1st kuih loyang..or kuih ros, and recently i found another name called kuih goyang. Whatever how you like to call it, this honeycomb cookies is Malaysians all races favourite snack and we especailly like to serve it in all major festive celebrations. This traditional cookies has a sweet taste and scent coming from the use of rich coconut milk. Our member Malay like to flavour with rose essence or vanilla while the Chinese are like to adding sesame seeds...

IMG_6781 copy

IMG_6852 copy


The round money shape or rose shape mould was given by my SIL who staying in Kuantan. I was so happy found another two special moulds, one is butterfly shape and another one is star shape..their very old stocks indeed, hard to find these patterns nowadays...

IMG_6878 copy

IMG_6799 copy

I modified this kuih Loyang recipe from a Pai Tee recipe given by my SIL the other day..we all loves this ranguh (crispy) and full of coconut aroma cookies !!

IMG_6768

kuih loyang copy

All my tips on how to get a nice honecomb cookies could be found in below recipe. My daughter helped me doing this and she also found a tip, i denote ** in the recipe for her tip..check it out !!

Honeycomb Cookies (Kuih Rose/Loyang) 蜂窝饼
(recipe source: by Sonia aka Nasi Lemak Lover)
*makes 5 medium CNY canisters

260g plain flour or all-purpose flour
IMG_6841 copy 260g rice flour
360g caster sugar
400g coconut milk (makes from 365g grated coconut+2 cups water)
200g water
4 large eggs
1/2 tsp salt

White sesame seeds
Oil for deep frying
Kuih rose moulds

Method

To prepare batter
1. Sift the flours together.
2. In a mixing bowl, combine coconut milk, eggs, sugar, water and salt. Whisk to dissolve the sugar and salt..
3. Slowly pour wet liquid into flour mixture, add sesame seeds and mix to form a smooth runny batter.

To fry
1. Heat oil in a heavy-bottomed pot on medium low heat until hot but not smoking (temp 180C).
2. Place the kuih rose moulds in the oil to preheat (2-3mins).
3. When the mould is hot (do not over-heat or the batter will not stick), remove mould and give it a shake to remove excess oil (to avoid creating bubbles in the cooked kuih rose).
4. Dip hot mould into batter to coat almost to the top of the mould ( put batter into a deep small bowl). Lift and give it a shake to remove excess batter. Also do not lift up immediately after dip into batter, let it coat for few seconds.
5. Plunge coated mould into the hot oil and cook till few seconds. Lift mould to release the kuih rose into the hot oil.
6. Continue frying until light golden brown colour, it will brown further after it is out of the oil due to the residual heat. Do not require to flip the kuih rose **. Remove and drain on paper towels.
7. Repeat until all the batter is used. Stir the batter before dipping in the hot mould.
8. Leave to cool completely before storing in airtight containers.

IMG_6797 copy

IMG_6812 copy

I just bought two small pots of Hyacinthus (风信子,洋水仙) from IKEA , simply beautiful and freshly fragrance !


IMG_6729


IMG_6741


I am submitting this post to Chinese New Year Delights 2013 hosted by Sonia aka Nasi Lemak Lover

 
Copyright 2009 CBS-Local-nasilemaklover. Powered by Blogger
Blogger Templates created by Deluxe Templates
Wordpress by Wpthemescreator