Tuesday, July 31, 2012

Beef Rendang, Encore!

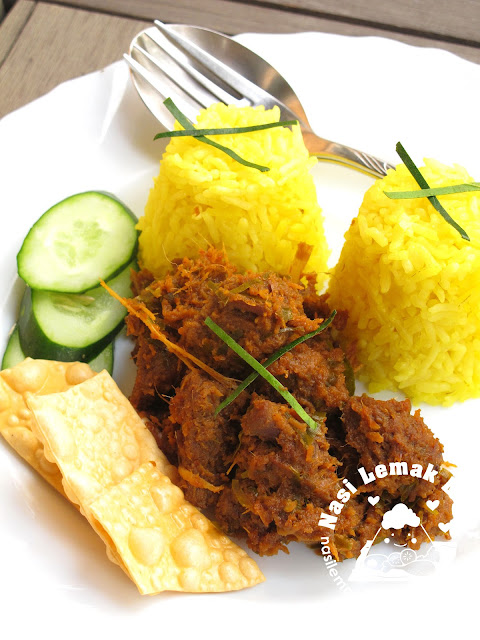
Yesterday i saw an advertisement in paper by a local Kopitiam (cafe) lauching for their Ramadan (Muslim fasting month) meal, their beef rendang look so yummy..I immediately went to pasar (wet market ) to buy all ingredients and cook this beef rendang meal (served with yellow turmeric rice ) the same day..


IMG_5369 copy

This time, i further enhance the taste by increasing the amount of the herbs used and also replaced white sugar with gula melaka (palm sugar) from the old recipe. I simply love to eat the fragrant herbs mixture after cooked..

IMG_5338 copy

A good rendang can't leave without kerisik (toasted coconut) . This time i also prepared more kerisik and store the balance in the fridge for later use..Stir fry coconut over low heat for about 20mins..

kerisik


IMG_5363 copy


Beef Rendang (1)
(recipe source : by Sonia aka Nasi Lemak Lover)


1kg beef cubes


Spice ingredients
150g shallots
15g garlic
15g blue ginger (lengkuas or galangal)
10g ginger
15g dried chili, boiled in hot water for 5mins and de-seeded
5pcs buah keras (candlenuts)
3 lemongrass, take white part only


25g turmeric leaves (3pcs), shredded finely
2 stalks of kaffir lime leaves, torn the leaf
2 lemongrass, pounded and torn finely
1pc tamarind peel (assam keping) ,small


1 and ½ cup water or adjust accordingly
1 and ½ cup coconut milk or adjust accordingly
50g kerisik (toasted coconut)
5 tbsp cooking oil


50g gula melaka (palm sugar) or to taste ( it depend on the sourness from the tamarind peel, so adjust accordingly)
2tsp salt salt or taste


Method
1. Blend spice ingredients till smooth paste.
2. Heat oil in a wok, add spice paste and sauté till aroma.
3. Add in beef cube, turmeric leaves, tamarind peel, pounded lemongrass and kaffir lime leaves, mix well. Add in water, stir to blend well.
5. Add in 1tsp salt, and simmer the mixture over low heat for several hours till beef tendered, add water if mixture turn dry and stir fry from time to time. Or you can use pressure cooker, once 2nd ring rise, turn heat to low, and cook for 30mins.
6. Add in kerisik and coconut milk, cook till gravy thicken.
7. Seasoning with balance salt and gula melaka, adjust taste accordingly. Stir fry till dry.
8. Serve with nasi lemak, or ketupat or steamed yellow turmeric rice.


beef rendang

IMG_5374 copy

IMG_5372 copy

If you can't take beef, you may like to check out the chicken rendang here..


I am submitting this post to Muhibbah Malaysia Monday ..


Sunday, July 29, 2012

Sakura Jelly


Beside used picked sakura to make cookies, the other day i tried to use the pickled sakura to make this Sakura Jelly..


IMG_4747 copy

It look so lovely !! but taste wise was nothing to shout out, the jelly just taste like those tidbit salted plum water.

IMG_4740 copy

Sakura Jelly
(recipe source: Inspired by A Daily Obsession, recipe with my own twist)

3 tsp gelatine powder
800ml water
100ml water from soaking the pickled sakura

2 tbsp honey
90g sugar

Some pickled sakura

Method
1. Mix water and water from soaking the pickled sakura together in a small pot.
2. Add in sugar, sprinkle gelatine powder on top, mix well.
3. Heat and stir to dissolve the sugar and gelatine.
4. Pour jelly in serving glass, drop the flowers and use toothpick to push sakura gently to and from so that the petals unfurl.
5. Cool and chill for at least 4 hours.


IMG_4733 copy

Saturday, July 28, 2012

Konbucha but not Kombucha? Japanese Chashu


One of the cooking ingredients that i was planned to buy during the trip to Japan is Konbucha, after saw Nami (Just One Cookbook ) introduced of this seasoning to be added when making Japanese Chashu. According to her, Konbu-cha is from Konbu/kombu seaweed and it is full of konbu glutamine and asparagine umami deliciousness. 

After several visits to departmental store like Daimaru and Isetan in Kyoto and Osaka, I still failed to get Konbucha. I decided to asked the staff (i think i was in Isetan) and shown her the picture of Konbucha, and she brought me to tea section and shown me Kombucha, she said Kombucha is same as Konbucha. This was what i bought back, Kombucha.

IMG_5307

After i went back to hotel, i re-checked what Nami wrote on Konbucha and realized that Konbucha is not Kombucha, just one letter difference "n and m"...Now i don't know what to do with Kombucha?
I did not give up, I went to look Konbucha by myself after my hubby went for meeting on our 1st day in Osaka. I copied down the address (but at this moment i forgot where i got the shop address at that time, memory loss ) and went to took subway alone and started my adventure in big city of Osaka and heading to the place where to get Konbucha.

This is the real Konbucha i got from Osaka...the same brand that Nami is using..

IMG_5308

I thought with the address with 天王寺, so i just stopped at 天王寺 station, but when i double confirmed with the staff stationed at the subway. They were so friendly, took out the detail map and checked the address i gave them, and they told me i have to switch two difference stations with two difference subway lines..At that moment, i was thinking whether i should proceed this Konbucha adventure since i was totally new to their subway system. At last, i still decided to proceed and later i found their subway is not that difficult once you understand how it works.
After came out from the subway station, i started to look for the shop, walked for quite far still could not locate the place. Luckily this Japanese uncle came approached me and he was so kind personally brought me to the shop. The 1st picture as per above were all the goods that they are selling. They were quite surprised a girl all the way from Malaysia to their Osaka shop to just purchase this Konbucha, so they gave me discounted price, hehehe..

Special Thanks to this Japanese uncle for his kind help. You can see the green signage behind him was the shop that i went.. Actually this uncle was on his way by walking to 天王寺 which take about 30mins..

IMG_3594


After came back home, i started my 1st Japanese chashu making. I always like this thin slices of round chashu in Ramen soup.

IMG_4260


I did not recorded down the exact ingredients this time, recipe largely adapted from Nami @ Just one cookbook's chashu recipe, but i made to the usual round chasu shape with some minor changes..

1. Leave the skin of belly pork this way...

2. Sprinkle Konbucha on the meat


3. Roll up the meat


4. Tie with string


5. Cook in the water, sake, soy sauce, sugar, spring onion, shallot and ginger mixture for several hours till cooked. I use speedy version as i cooked using a pressure cooker which only took me 25mins.


6. Japanese Chashu is ready. I keep in the fridge overnight before slice it as to firm it up so easy to slice.


I served this Japanese chasu in a bowl of miso Ramen soup, yummy! If you were asked me how Konbucha taste, i would say it taste 甘甜..(i think this was what Nami meant umami )


As usual, i bought extra Konbucha. I have one bottle to give out to someone who loves Japanese foods (limited to Malaysia and Singapore readers only). This time there will be no lucky draw but you have to convince me by leaving a comment in this post telling how much you love Japanese foods. I will be the one decide who to give ^-^


Here is addres of this shop:-
543-0023, 大阪市天王寺区味原町6番9号
Tel: (06) 6761-7331


Latest update on 20th July 2012- few readers commented that Konbucha is same as Kombucha because the pronounciation issue. I decided to open the Kombucha and taste it, and i found Konbucha has stronger kombu taste than Kombucha, both are seasonings powder. Kombucha is in fine powder form whereas Konbucha is slightly in coarse powder form. If you still confuse what Kombucha or Konbucha is, to simplify it, it is similar like those chicken stock seasonings powder that we usually use, but this is with Kombu 昆布 flavour.
I still need Nami to further clarify whether are the the same..Nami, please help..

Thanks to Nami for further explained this, and it is concluded that Konbucha and Kombucha, they are the same thing.  I just added Kombucha when i stir fry green veggie, and it actually add flavours to the veggie , similar like the MSG i use to add in when stir fry veggie.


Updated on 26th Aug 2012- Thank your for participated in this giveaway. I have chosen the winners (i actually gave away 2 bottles) , and the winners have received my notification via email..
Thursday, July 26, 2012

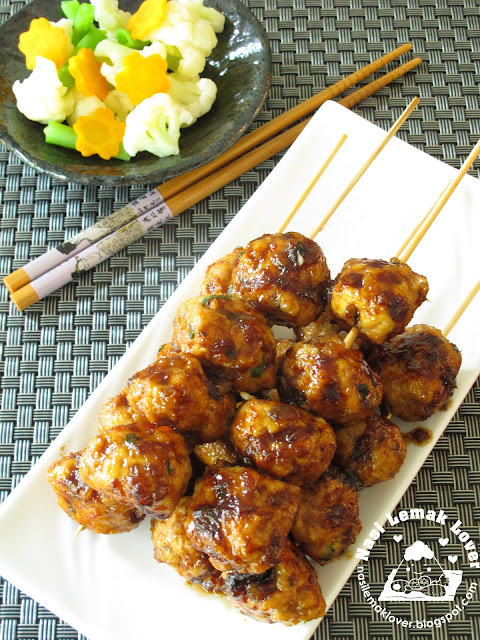
Teriyaki chicken meat balls

The other day i told you that my son Desmond refused to take my bento lunch as he is prefered to the foods from canteen..But now no more, he is keeps asking me to bring bento lunch for him, you know why, because his classmates always praise on his bento lunch. So now he is very proud to have bento lunch, little boy is little boy, hehehe..
Today i made this Teriyaki chicken meat balls for bento lunch. I like to use those tough part of chicken e.g chicken breast or meat attached to chicken wings to make into meat balls..

IMG_5219 copy

IMG_5226 copy

After i have learned on how to make Teriyaki sauce from the scratch from Nami (Just One cookbook), no more buying store-bought Teriyaki sauce because this sauce is very good (I increased the sugar amount because we prefer slightly sweet sauce).. Thanks to Nami for her kind sharing.

 Teriyaki chicken meat balls
(recipe source: Teriyaki sauce adapted from Just One Cookbook with minor changes)
Chicken meat balls ingredients
400g minced chicken (better with little fat)
1 onion (small size), chopped
1 sprig spring onion, chopped
1 egg white (small)
1tbsp light soy sauce or to taste
3/4tsp salt or to taste
1/2tsp chicken stock powder
1tbsp tapioca flour or corn starch
1tbsp water

Teriyaki Sauce
3 Tbsp. soy sauce
4 Tbsp. water
1 and ½ Tbsp. sake
1 and ½ Tbsp. mirin
2 tbsp sugar
1 inch onion, grated, including juice
1 inch ginger, grated, including juice

Method
1. Mix minced chicken, onion, spring onion, egg white and all seasonings in a mixing bowl, stir to mix well. Set aside for 1 hour.
2. Shape minced chicken mixture into small ball, place on a frying pan or HappyCall pan, sprinkle little oil, fry till both sides golden brown (took about 5mins).
3. In another saucepan, add in Teriyaki sauce, cook the sauce till sugar dissolved over low flame.
4. Pour Teriyaki sauce into frying pan with chicken balls, cook until the sauce is reduced a bit. Use spoon to pour on top of chicken balls a couple of times while you are cooking.
5. Serve warm with steamed white rice.

IMG_5209 copy

I use this grater that i bought from Osaka, can grate very fine ginger and onion or etc..
IMG_5179

Also use the new HappyCall Pan (HCP) to pan fry the chicken meat ball, very good pan, no oil spill while cooking..
IMG_5182

IMG_5188

IMG_5191

Actually i brought quite a lot of kitchenware from Osaka, this aluminium saucepan was one of them. I bought at very good price (about RM 12) and the aluminium is thick. 

IMG_5186

IMG_5185

I bet my kids will enjoy this bento lunch..
IMG_5229 copy

Happy Weekend ahead to all...


Wednesday, July 25, 2012

Steamed Pumpkin buns with Lotus paste filling 南瓜小包子

The other day my blogger friend Simple Menu (Yan) forwarded a link to me and asked me : you do you do, you can do this, hahaha..
She always asked me to try out new recipe when she found any interesting recipes. Since i still have half pumpkin sitting in the fridge, why not try this cute pumpkin bun which look like pumpkin shape.

IMG_5154 copy

When i see this white lotus paste selling in the bakery ingredients shop and realized that Mooncake festival is approaching. I quickly buy this paste first before they sold out very fast..So i use this lotus paste to make the filling for this bun.

IMG_5126

Use a butter knife to make the pumpkin pattern
IMG_5135

IMG_5129

Before steam
IMG_5134

IMG_5136
   

IMG_5167

Steamed Pumpkin buns with Lotus paste filling 南瓜小包子
(recipe source: visually inspired by here, recipe by Sonia aka Nasi Lemak Lover)
*makes 13 buns


Ingredients
150g mashed pumpkin ( steam or microwave to soften)
225 all purpose flour
IMG_5157 1tbsp sugar
1/3tsp salt


To make yeast water (set aside for 5mins to bloom)
1tbsp lukewarm water
1tsp sugar
1tsp instant yeast


Filling- lotus paste ( you can replaced with red bean paste, peanut or etc)
Pumkin skin- cut into small piece to make as pumpkin’s stem


Method
1. Add in all ingredients and yeast water in a mixing bowl and knead till smooth dough.
2. Cover with damp cloth and rest for 60mins.
3. Knock down dough to expel some air, transfer to a lightly floured surface and knead for a while.
4. Weigh out 30 gm of dough and roughly shape into a ball and rest for 10mins.
5. Weight lotus paste 15g and lightly shape into ball.
6. Fatten and roll out the dough into a circle. Place lotus filling onto the center, wrap and pleat up the sides and seal.
7. Use a butter knife, mark from top and lightly press down towards bottom, keep a small gap in between, repeat this step till whole dough ball finished. Place a small piece of pumpkin skin at the middle and lightly press down.
8. Place the pumpkin buns (pleat area face down) onto a piece of greaseproof paper, on the rack for steaming. Cover with a piece of damp cloth and let rise for another 10-15 mins.
9. Lightly mark bun with butter knife again (to sharpen the pattern), steam the buns under rapidly boiling water on high heat for about 15mins.
10. Wait for 2mins then only open the lid and remove from the steamer.

Sunday, July 22, 2012

Chocolate Cupcakes and Swiss Meringue Buttercream

My daughter requsted me to make chocolate cupcakes yesterday as she would like to bring to school for her best friend's Birthday today.
IMG_5064 copy

I am very happy found this good Swiss meringue buttercream recipe from "the batter baker". Her recipe is easy to follow and yet resulted a very stable (in our hot and humid weather) , not taste oily and less sweet buttercream.

IMG_5074 copy

I just put these cupcakes on the island top in room temperature. This morning i took this picture, see the buttercream still beautifully stand in shape, instead the colouring sprinkles has started to melt..
If you are new to Swiss meringue buttercream, here is a video i want to share, her recipe called 123 Swiss meringue buttercream, so you can have a idea how this buttercream is making..I tried her recipe, but found out is a bit too sweet for our liking. If next time i make this buttercream again, i will share with you the step by step photos.

IMG_5123

My daughter even decorated with a Justin Bieber fondant on the cupcake as JB is her friend's favourite star.

IMG_5116 copy

IMG_5119 copy

I made some changes to the chocolate cupcake recipe as one reader asked me whether to add chocolate emulco can make chocolate cupake look darker. So i added chocolate emulco, and it is confirmed that the colour of the cake look darker than not adding chocolate emulco. I also halved this recipe since my 1st time trying this recipe. And i was using hand mixer instead of stand mixer since i prepared in a very small volume.Also I left the butter stand on room temperature about 30mins before i started to make the buttercream, it should be soft but still cold.


Chocolate Cupcakes and Swiss Meringue Buttercream
(Recipe source: adapted from The batter baker, with minor changes)

Chocolate Cupcakes
Makes 6 cupcakes.

90g cake flour
10g cocoa powder
70g sugar
3/4tsp baking powder
65g butter, softened
30g milk
1 whole egg + 1 egg yolk
1/2 tsp vanilla extract
1tsp Chocolate emulco

Method
1. Sift together cake flour, cocoa powder and baking powder.
2. Beat butter and sugar till light and fluffy.
3. Add in whole egg and egg yolk, combine well.
4. Add in vanilla extract and chocolate emulco.
5. Add in flour mixture and milk alternately, mix well.
6. Scoop batter in cupcake liners.
7. Bake at 180C for 25mins.
8. Remove cupcakes onto a wire rack to cool completely before frosting.

Swiss Meringue Buttercream

1 egg whites (large egg)
45g sugar
1/4tsp vanilla extract
75g unsalted butter, soft but still cold, cut into small equal size of cubes

Method
1. Whisk egg whites and sugar over bain marie (in a double boiler) till sugar is fully dissolved (to test by touch it and rub with fingers)
2. Remove from heat and whisk for about 10 min till peaks are stiff, thick and glossy.
3. At this point, the mixing bowl should be cool to the touch. Add vanilla extract.
4. Change to the paddle attachment (I use hand mixer all the way since just a small recipe).
5. With the mixer at low to medium speed, add in the butter cube one by one, ensuring that each addition is well incorporated before adding the next one.
6. If the mixture curdles, don't panic. Continue adding the butter and beating the mixture on medium speed.
7. After a few minutes, the mixture will come together and become creamy and satiny.
8. Add colouring if desired and beat till evenly distributed.

** updated on 17 Aug- please refer to the latest Swiss Meringue Buttercream recipe here with step-by-step photos.

IMG_5070 copy
 
Copyright 2009 CBS-Local-nasilemaklover. Powered by Blogger
Blogger Templates created by Deluxe Templates
Wordpress by Wpthemescreator